Tuesday, August 31, 2010

From Kitchen to Garden

This is a project that my mom came up with and I went over to her house to help. I'm not really sure where she got the idea, but it is too cute to not share it with you. I also am aware that my tutorial writing skills are somewhat lacking, but bear with me. 


We started with a variety of thift store plates and cups.  When you are getting them, just make sure they nest together well. 
Then glue the plates together in the proper order.  We used Gorilla Glue, but whatever you use, make sure you follow the instructions.  Before you put the glue on them, figure out where the plates touch.  We had some issues figuring out where to put the glue to make it stick.  After you glue the plates together, glue the cup into the center.  The inside of our cup was a little plain, so we decided to jazz it up a bit.
We used a clear stone and backed it with this marblized paper that mom had from an old project.  We used Mod Poge to attach the paper to the stone then Gorilla Glued it into the tea cup.
The final step is to attach a pipe fitting onto the back.  I dont know what this piece is called, but am aware that the picture is sideways.  :)  We used Gorilla Glue for this too. 
The final step is to put the whole thing on a piece of rebar and stick it in the garden to get this:

Monday, August 30, 2010

Baby Shower Gifts

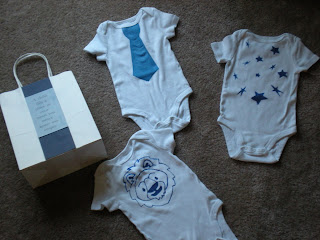
Two of my sorority sisters are having babies in December, but we had a shower for them this past weekend.  I knew I wanted to make my gifts and thought I would be all responsible and get them done before school started.  Both babies were girls, so I made my plan, bought my supplies and got crafting.  I literally had just finished painting the last onesie and went to check Facebook to see if anything interesting was going on.  Turns out someone was being a little shy at his last ultrasound and one of the babies was actually a boy.  So I had to come up with a new plan.  Shows me for trying to work ahead. lol.  So here is the finished product of what each momma got:
These are the baby girl gifts.  Originally each momma was going to get a onesie with the tutu (I go the idea here), a legacy onesie and another onesie that I painted using a cut out from my Forever Young Cricut cartridge.  The Circut onesies are more usable since I don't have any more sisters having girls (that I know of), so I switched things up a bit and baby girl got two legacy onesies and a tutu.  I decorated plain white bags from the dollar store.
I had a harder time coming up with baby boy ideas.  Since it was a joint shower, I felt like I had to give them similar things and since I made one set of gifts that I needed to make the other.  Plus with school starting last week, my brain was a bit scrambled.  I think they turned out cute though.  I googled onesie tie pattern and cut it out on freezer paper.  For the one with the stars I used freezer paper too but cut it on my Cricut.  For the lion I googled lion cartoon coloring page.  When I found one I liked I printed it out.  I put it under the onesie and used it as a stencil. 
Here are the finished bags all wrapped up.  The gifts were a big hit at the shower!

Sunday, August 29, 2010

Scrapbook Sunday


I mentioned in my last post that I like to use tickets in LOs.  For weddings I sometimes also like to use invitations and programs as well.  This is a simple LO of a friend's wedding.  I used the red background and gold letters to match her colors.  I also included the invitation and program instead of putting the date on the LO.


Here is another wedding LO.  The background matches her colors--pink and green--and I used the ceremony program too.  I wrote the date behind the tag with the love sticker on it.

Saturday, August 28, 2010

Scrapbook Saturday

This LO is from a Royals game last summer that I went to with some law school people.  It's pretty simple.  I like the baseball patterned paper here--usually when Michaels or Hobby Lobby have their paper on sale I usually pick up a few pieces.  I also really like to use tickets and things like that in LOs because I don't really want to throw them away but I don't like for them to just sit around collecting dust either.


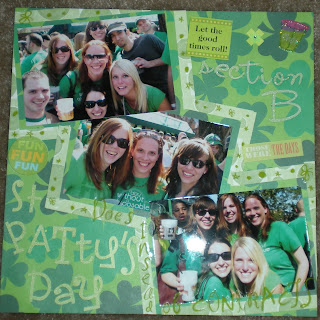
I love how green this LO is!  It's from St. Patrick's Day my first year of law school when a bunch of people from my section met up.  I got the shamrock patterned paper espeically for this and other than that, I just raided my supplies for everything I could find that was green.

Wednesday, August 25, 2010

Seriously, nothing is safe

I keep my keys on a lanyard so I can fish them out of my giant purses.   For a long time I was using a Miller Lite lanyard but it was neither cute nor is it very professional or anything.  So I found a plain black lanyard in my desk (no idea where it came from) and decided to make it cute.  Now I don't have a sewing machine and my mother's hates me and when I get an idea I usually want to do it right away and not wait around.  While doing this particular project I was listening to lectures on professional responsibility (they make lawyers take an ethics test as a requirement to be admitted to the Bar).  I had some ribbon that was the same width as my lanyard so I sewed it on.  I sewed it by hand which took a while. But I had over 4 hours of lecture to listen to so I had time.  If you used a sewing machine, it would not have taken hardly anytime at all.  My lanyard was twisted (on one side the ribbon would have been on the inside) but I wanted to use one continuous piece of ribbon so I just sewed it at the base.  I then cut a small piece of ribbon and wrapped it around the base to make it prettier.  Also I didn't want the colored thread to show on the backside so I colored it with black sharpie.  So pretty much this project was pretty ghetto but in the end it turned out really cute and a huge improvement over Miller Lite.

Tuesday, August 24, 2010

Record Wall

My old roommate did this one on the wall of our living room.  She got the records a a thrift store so they were super cheap.  One of the great things about it really could be about as big as you needed it to be so you could cover a huge wall for a small amount of money.
Everything was held on the wall with thumb tacks.  Super easy and cute!

Monday, August 23, 2010

Paper Bowls and Candle Holders

I apologize for my absence, but life decided to get in the way of blogging.  I have lots to post about though.  I have several projects that I have done recently so I'll catch you up over the next few days.

These were actually my mother's idea, but I cam over and helped her make them one day.  They are super simple!  Start by cutting colored cardstock into strips.  We used our paper shredder (which I think gets more craft use than practical use) so it was super fast.  Then take whatever you are using to shape your container.  To make the votive holders we used Chinet plastic cups (the little clear ones) because we have 30 million of them.  You could also use bowls.  I'm not sure what my mom used to make the square one.  Point is you can use pretty much anything.  We then covered our base with plastic wrap to make it easier to take off after it is dry and the paper has shrunk a little.  Then mix a little bit of water with some Elmer's glue.  Dip the strips in the glue and place them around your form.  Depending on the look you are going for you can put them on as think as you want.  For the votives I wanted a little more open space for the light to come through so I left more gaps.  Just make sure the strips are all connected so that nothing falls off when you take them off.  Then when you are done, let them dry and carefully remove the paper from the forms.  Here are a few examples of what we did:
This square one is just the right size for coasters.

This one is slightly heart shaped which was not on purpose but turned out really cool.  It holds, among other things, my Ipod case, a Chik-fil-a cow and our Bluetooths (Blueteeth?).
This is one of the votives.  I used two colors of paper on this one.
Here is another votive--you can see how many gaps I left in this one.
This project is super super easy and doesn't take too long other than drying time.  They are great for holding all kinds of stuff from candy to electronics and so on.

Sunday, August 22, 2010

Scrapbook Sunday

My friend Kara took me on a trip to Mexico with her family so as a thank you gift, I made her a scrapbook of our trip.  I made one for myself too, so you're going to get to see a lot of layouts from this vacation.
The shells at the bottom are cut from another page and the swimsuit, flowers, flip-flops and lotion are stickers.  "Beach Bum" is from a vellum vacation themed stack. 

This picture is a little blurry, but I love this LO.  The background is three different strips of blue paper.  Then under the picture is strips of torn blue paper and strips of different blue ribbons.  The tassel is from a bookmark and attached with a brad.  The blue flip flops are stickers as are the letters (DBFF is our nickname for each other) and the little stars/flowers in the corner of the picture.  I wrote her a little thank you note in the bottom in blue.
The shells around the pictures are ones that I brought back from Mexico.  The title is from the same velum pack.  I used the tan paper on the bottom to look like sand over the blue water print paper.

Wednesday, August 11, 2010

Nothing is Safe

Boyfriend is moving in with me next week and I told him that I would try really hard not to get all crafty on his stuff without his permission.  He thought I was kidding.  I wasn't.  Nothing is safe.  For example, I found blue At&T koozie in my car the other day.  Not sure how it got in there, but after I pulled it out, I decided that I needed to make it pretty.  I actually did this project last week, but wanted to make sure it wasn't going to fall apart before I posted about it.  I am happy to report that it survived a weekend at the lake.
The thick white ribbon is from the Dollar Tree.  I doubled it over so that it would cover the AT&T logo.  I originally tried fabric glue but it wasn't strong enough so I switched to hot glue.  Then I glued the smaller black and white ribbon to cover the seams.  There was a pretty massive seam where the white ribbon met, so I covered it with the flower.  It is made of ribbon, using (more or less) this tutorial.  I sewed it together with clear jewelry thread (like fishing line) to make it stronger.  The center is an extra button off a sweater that I don't have anymore.  In the next picture you can see how I glued little gems around on the white ribbon.

You can kind of tell on this picture that there is a line around the middle of the ribbon.  That is from the fabric glue.  I'm not thrilled with it, but you can't really tell unless you are looking at it up close.  I would also suggest if you make one of these that you put a can in it before you start.  I didn't have any can, full or empty, in my apartment, so I used a bottle.  It is a little smaller than a can, and so it is a little bit of a tight fit, but it still works.

Tuesday, August 10, 2010

Frame Redo--Baby Style

I have a Dollar Tree within walking distance of my apartment, so when I get bored, I usually head up there to see what kind of things I can find to get crafty with.  I don't have a before picture of this frame, but it had baby toys kind of stung out on the bottom.  Anyway, it was not so attractive.  But I had been babysitting some friends' baby girl and took a bunch of pictures of here, so I thought I would make her mom a cute little frame with one of the pictures in it. 

Isn't she adorable?  I covered the frame (it was plastic) with scrapbook paper using Modge-Podge.  I love that stuff.  Actually a lot of the reason I made this frame is that I had just bought a bottle of Modge-Podge to make some coasters with (post coming soon) and I remembered how much I love the stuff.  Her name and the hearts were cut out on my Cricut and the other stickers were from a random pack my mom got me a while back.  Its not much, but it was dirt cheap, fairly easy (would have been even easier if I had just spray painted the frame pink then embellished it) and Callie's mom loved it.

Monday, August 9, 2010

Ice Cream Cake Upgrade

Boy friend has this group of buddies that he is really close to.  So close in fact that we see this group of people nearly every Sunday of the year.  In the late spring/summer/well into fall, the boys play softball and then when it is not softball season, we all get together to have dinner.  Since I joined this little group, it has evolved into going to a different house each week and the host/hostess provides the main dish then other couples are assigned to bring sides, dessert, beer, etc.  One week we were supposed to bring dessert.  A few weeks before, one of the girls and I had gone on a late-night ice cream cake search only to come up empty handed.  I LOVE the ice cream cakes from Dairy Queen with the cookie crumbs and fudge instead of cake.  My mom made me one once, so I know it is possible and actually quite easy, but it was also quite messy.  I also LOVE the Kansas Jayhawks.  I grew up in Kansas, about five minutes from the state line with Missouri.  Now I live a couple of minutes from the state line in Missouri, but I still am a Kansas girl at heart.  Now if you're not from KC, then you probably don't know about the Kansas-Missouri rivalry, but let's just say, they call it the Border War for a reason.  Boy friend and all of his buddies are Mizzou friends, which pains me, but I get over it because they don't really like college sports anyway.  Not everyone can have good taste.  So I decided this particular week that I wanted a Jayhawk ice cream cake.  I started out at the closest DQ to my apartment and they only had super ugly air brushed cakes with cats and tool belts on them.  I asked if they had any plain cakes and they said they wouldn't have any until the next week which would be when they could personalize a cake for me.  Don't really know what that is about.  So I set out to the next closest DQ, which was a ways further away, but on my way to Target (where I shop at least weekly).  It would have taken them longer than I had to make a Jayhawk cake for me, but they did have plain cakes.  She offered to do the little border for me but i was afraid I would mess it up while decorating so I declined.  Now that I have typed all this, I give you the super easy steps I followed to decorate my own Jayhawk ice cream cake.
I used a cookie cutter that I had to make an outline of the Jayhawk's head in the cake, then filled it in with gel icing.  The sprinkles were from red, white and blue jar--I was feeling particularly OCD this day, so I picked all the white ones out.  After actually finding the cake, the whole project probably took me half an hour and was quite cute, if I do say so myself.  I have to give my own opinion on this one, because I took it to a bunch of people who don't like my team, so they didn't really appreciate it as much as they should have.  So if you don't have a lot of time or energy, but was a cute personalized cake, try this.  I think it is easier than decorating a regular cake because the icing is frozen so harder to mess up plus if you get a little gel out of place, it is fairly easy to wipe off.

Sunday, August 8, 2010

Scrapbook Sunday

More scrapbook pages for you!


This LO is from when I was a bridesmaid in the wedding for my friend (and sorority sister), Megan.  Her colors were blue and yellow.  The ribbon and flower petals are from my bouquet.  Its a pretty simple LO but I think it works and it was when I was first learning to scrapbook.


This is another simple LO of me and two of my sorority sisters, Marilyn and Beth. Its kind of hard to tell from the picture but the background and words are in purple.  "First Finest Forever" is one of our mottos.  To quotes are both velum--one is from a stack about girls and the other from a book full of words and definitions.  I printed the words off on my computer using Microsoft Word.

Saturday, August 7, 2010

Scrapbook Saturday

I started scrapbooking in college and I love it!  I decided to feature scrapbook pages on Saturdays and Sundays because I have so many to share.  I'm going to start with one of my older scrapbooks, which is all sorority pictures from my freshman and sophomore years.


This is a picture of some of my girls at a fraternity philanthropy event--Watermelonfest.  It's hosted by the Lambda Chi Alphas (those are their letters across the top written in silver sharpie on some of the seeds) and it is basically watermelon olympics.  There is a watermelon eating contest, watermelon bowling, greased watermelon carrying relay and tug of war with a pile of smashed watermelon in the middle.  Then later that night there is a watermelon queen pageant and a watermelon carving contest.  I think the layout is pretty self explanatory. This was before I had anything cool, so everything is hand cut and then just glued down.  The page is a funky size--I think its like 9x9 or something.  My grandmother got me the scrapbook for Christmas from a store that sells sorority stuff but I have no idea why it is a wonky size.
This LO is of me and one of my good friends Mandy.  The picture is one of the professional ones taken on bid day, which is why it has words printed on the bottom.  I love how the black and white picture works with the colors here, but I wish the picture were in color because my hair was so red then (a dye mishap that I now kind of miss).  The lion cut out was something given to me by our new member educator.  I think some alum or older member had made a bunch of these for some reason and there were a bunch left in the new member goodies.  In case you were wondering, the lion was our mascot, which is why he appears all over the place (I'm not weirdly obsessed with lions for no reason lol).


Friday, August 6, 2010

Watermelon Fountain

I was browsing through blogs, and I came across this super cute idea.  As I would have no reason to make this on my own, I asked my mom if she wanted one for the summer party that she and my dad were having.  Like with most things I do, I didn't really follow the directions, so I though i would show you how I changed it up.  Mom was in charge of supplies, and she found the perfect watermelon--one that was more oblong than round and instead of getting a metal spigot, she found a plastic one.

In the other tutorial, they cut the hole in the back, but we decided to do our jack-o'-lantern style and cut the top out.  I'll be honest, the first hole I cut ended up being way to small to scoop out the insides so we cut another hole that was bigger.  We put both pieces back in the top and you really could hardly tell.

Here it is with the top cut off.  I also before this had sliced a little off the bottom so it would stand up better.  I used this to cut the top off.  I really have no idea what it is normally for--the only thing I can ever remember using it for is carving pumpkins. 

Next I scooped out the inside of the watermelon.  I had originally planned on using a melon baller to make it nice and pretty but soon realized that to do so would take me approximately forever.  So instead I used an ice cream spade.  It was not nearly as pretty but once we cut up the scooped watermelon, you could hardly tell. 

After it was sufficiently scooped out, I used an apple corer (which happened to be just the right size for our spigot, but you should check first) to cut the hole for the spigot.  We put it fairly low on the watermelon for maximum fountain potential and it worked quite well.  You'll just kind of have to guess though as to where to put it, based on our watermelon, spigot and where you plan to serve it.

Here's the almost finished project still in the kitchen.  As you can probably tell, it made a bit of a mess, so plan accordingly.  For the watermelon lemonade, we did things a bit differently.  We weren't sure how long the watermelon fountain would hold up and we were going to serve watermelon anyway, so mom got a second watermelon and cut it up to make the puree.  She strained it then froze part of it in a tupperware container to keep the lemonade cold then put the rest in the fridge.  We broke the frozen part into a small enough piece to get it in the watermelon then mixed some of the puree with lemonade (she likes to use some frozen concentrate with a tub of the cheap Crystal Light type mix).  We ended up with enough ice and lemonade to fill the watermelon twice.  Here is the finished product out on the table:

We put the tray underneath it in case it leaked.  The lemonade didn't come out superfast, which was ok.  We did have one issue with it getting clogged, but it took me all of five minutes to get it taken care of.  It was a huge hit and everyone loved it!

Wednesday, August 4, 2010

Mother's Day Bookmark Card

So I know that I'm am a little late/early for Mother's Day, but I am trying to post about old projects so I can take the pictures off of my computer.  This is a card I made for my momma a few years back for Mother's Day.  It doubled as her gift because all of the flowers come out and are bookmarks.
The basket is made from two half-circles of cardstock.  I punched holes in them and "sewed" them together with ribbon.  Each to bookmarks is white cardstock with a quote about moms written on them.  I topped them with flowers cut out of scrapbook paper.  They are all cut at different lengths so that you can see all the flowers.  If you had a Cricut or flower punch or some other way to cut out the flowers fast, this is a super quick and simple project and would be a great gift for anyone who loves flowers and reading.

Tuesday, August 3, 2010

Personalized Gift Box

A while back, I attended a baby shower for one of my friends who was having a baby girl.  I had picked out a couple of super cute outfits and was trying to decide how to wrap them.  I usually just put things in gift bags unless they come in a box because I am not a fan of wrapping oddly shaped things.  I didn't have any appropriate gift bags in my stash, so I went to Target to get one.  They had these pink shirt boxes, and since the baby's momma loves pink, I decided to put the outfits in the box and embellish it with things from my scrapbooking stash.  Here is the final result:
The butterflies at the top are rub-ons.  I used two colors of pink ribbon from my wrapping stash to keep the box closed.  The tag is made from a velum quote about baby girls from a stack, different pink scrapbook papers, and rub-ons--the C (for Callie) is under the velum quote, then I put "Baby Girl" at the bottom of the tag and there are some pink flowers at the top that are hard to see because of the ribbon.  On the bottom I used pink chipboard flowers and glued the little rhinestones to the centers of some.  I think I actually glued them on with pink puff paint just in case any of it showed though.  The box looked super cute, the mom loved it and it helped me use up some of my scrabooking stuff so that I could justify going out and buying more. :)